Saturday, January 12, 2008

Creating Catalogas and Collection Folders in Photoshop Elements


How to create a New Catalog for Creating VCds, Photo Albums and so on...

Step 1. In the Photo Browser or Date View choose File > Catalog > New


Step 2. It is optional if you place a check mark to select import free music into new catalogs.


Step 3. Choose a location for the new catalog. This time we will use the default location inside the computer hard drive.


Step 4. Type the Filename: My catalog and click on Save


Step 5. After you create your catalog is time to import some pictures to it. File > Get Photos > From Files and folders


Step 6. Try to remember that there are more options. In this case, we import from the computer hard drive.

Step 7. Import pictures from a Flowers folder inside the computer hard drive.

Step 8. Select all the images, by clicking the picture 1, holding Shift click on the last image


Step 9. Finally we have imported all images to Adobe Photoshop Elements


Step 10. Once you have created the Catalog it is important to create a Collection. A collection is like a container where you put your photos into.

a) Click on Collection Tab


b) Select New > New Collection as you can se in the picture below


c) Type a Name for the Collection: My Digital Album and click OK.


Step 11. Its time to add pictures to your collection. Make sure you select All pictures and drag the collection icon over any picture and let it go. We notice that we have some tags on all the pictures which means they are in the collection


Step 12. Now we added all pictures to our collection, make sure one more time that we select all pictures. You can notice a blue frame around the images which means that all images a re selected. Click on Create and we are ready to make calendars, Photo Albums, VCDs with music and much more


Friday, January 11, 2008

Creating a Background Template

Step 1. Create a new document; I used a size of 600 x 600 pixels. 72 pixels/inch.Change the foreground color using the following hex code: #ede3b4. Alt + Backspace to fill the canvas.

Step 2. Next create a new layer, then find and get out the Rectangular Marquee Tool:
Step 3. You select the second option with is the Add to selection. This option let's you make more than one selection.


Step 4. Now make a few separate selections taking up the whole height of the document, but only a very thin amount of the complete width.


If you’re on a new layer, fill your selections with a nice, vibrant color. I used #79eae9. Lower the opacity for the blue lines layer to about 35% in the layer palette, and then you should have something like this:


Step 5. Select > Deselect or Ctrl + D to get rid of the selection


Step 6. Let’s add some selections and Alt + Backspace to paint. I will use (#e9aaf4) to paint this time.

Step 7. Keep adding more selections if you want. I will use #aad2f4 this time and finally Ctrl + D to deselect the selectiont.

Step 8. Finally the last step go to Layer > Merge Down to make your background image only one layer.

Applying Gradients to Create Tex Effects

Step 1. Create a 800 x 600 pixels, 72 pixels/inches, white background image.

Step 2. Select the type tool (T), and type the word “Gradient” as shown


Step 3. Make sure you click the Commit check mark to finish the typing command.


Step 4. Sometimes you need to change the color, edit your typing or just change to different shape. If that is the case, double click on the text thumbnail and proceed editing. Once you get what you want make sure you press ENTER key.

Step 5. To change the text size you can press Ctrl + T, which is the transform command. Resize it if you want.

Step 6. Keep the text layer selected and its time to simplify it or rasterize it to make the text to Pixels. Layer > Simplify Layer or Layer > Rasterize> Type.

Step 7. Holding the Ctrl key, click on the text layer thumbnail to select only the text as you can notice in the picture below.


Step 8. Select the Gradient Tool, by clicking on the Gradient editor. And finally cross out the text form any angle.


Step 10. I will select the Spectrum and this is the final result. Ctrl + D to deselect.

Thursday, January 10, 2008

How to Fill Layers with Colors

Fill with Solid colors

Creates a layer filled with a solid color chosen from the Adobe Color Picker. There are two basic colors to change: The Foreground Color and the Background color.

Filling a Layer with Gradients

Gradient Creates a layer filled with a gradient. You can choose a predefined gradient from the Gradient menu or just edit the gradient in the Gradient Editor and apply it just dragging the mouse on the canvas.

Let’s work in a simple project creating patterns in the Gradient Editor.

Step 1. Open Photoshop and create a new image. 600 x 600 pixels, 72 pixels /inch, white background.

Step 2. Change the Foreground and the background colors of your choice

Step 3. Select the Gradient Tool (G)
and you will notice that the menu bar changes giving you many different gradient options as shown


Step 4. Click on Edit at the menu bar or just double click the picture on the left of the Edit button to open the Gradient Editor


Step 5. In the List of Preset Gradients the Preset 1 is yours because is the combination of the Foreground and background colors.


Step 6. You can add some Stops by placing the mouse and clicking on the Edge of the Gradient bar.


Step 7. Change the color of the Stops by clicking the color button below the gradient bar. Select it first to make it active and change the desired color. Click the New button to save it in presets window. Click OK.

Step 8. Using the mouse drag it on the canvas and you will get the following
a)
Linear Gradient


b) Radial Gradient


c) Angle Gradient


d) Reflected Gradient


e) Diamond Gradient


Fill Layers with Patterns

Pattern Creates a layer filled with a pattern. Click the pattern, and choose a pattern from the pop-up palette. You can select Patterns from Photoshop preset patterns window or just create patterns yourself. I think this is the best way. Use Photoshop to create your own patterns, save it and fill out layers or create amazing Text effects with patterns.

Step 9. Select Edit > Fill Layer


Step 10. At the window, change Use Pattern and chose the Custom pattern you want and click OK.

More on Road Signs

Step 1. Open Photoshop and create a new 600 x 600 pixels image, 72 pixels/inch, White background.

Step 2. Select the Custom Shape Tool >, and you try to get the Octagon Shape as shown in the picture below.

Hold the mouse and make a selection as shown


Step 3. You will notice that automatically creates its own layer.


Step4. The new layer it’s a shape layer. Shapes are vectors and Photoshop works with Raster images o pixels. The process of changing from Vector to Pixels is called Rasterizing or Simplifying.

Step 5. We need to make that happens before we proceed to change the attributes of the new octagon. Keeping the shape Layer selected, Layer > Simplify Layer if you are using Photoshop Elements. If you are using Photoshop CS3 go to Layer > Rasterize >Shape.

Step6. You can change the color of the shape by clicking the tool at the menu bar as shown.


Step 7. Duplicate the Octagon Layer by selecting Layer > Duplicate Layer


Step 8. Change the stroke of the duplicate Layer. Use Edit >Stroke, change the color to white and use 15 pixels. Click OK.


Step 9. Ctrl + T to transform and Make the duplicate layer smaller and you will get the following image.


Step 10. Finally using the Horizontal Type Tool (T) type Stop and resize it as needed.

Wednesday, January 9, 2008

Making Road Signs

Step1. Open Photoshop and create a new Image, 600 x 600 pixels, 72 pixels/inch, and white background.

Step2. Create a new layer by clicking on a New layer icon

Step 3. Select the Rectangular Marquee Tool and make a rectangular selection. Remember you can just press the letter “M” to select the Rectangular Marquee Tool.


Step4. Now it’s time to change the stroke size and color of the selection. Please click on Edit >Stroke (outline) selection. Use the following settings: Click OK.


Step 5. Holding Ctrl Key, press D to deselect. (Ctrl + D)


Step 6. Select T for Text, Type One way. Use any font. If you want to change the font remember to double click on the Text layer thumbnail and your text will be selected.


Text Thumbnail

Step 7. Keep the Text Layer selected and select the Custom Shape Tool. Please look where it is located.


Step 8. Once you select the custom shape Tool, the icons in the menu bar changes. By default the shape you get is a heart.


Step 9. Click on the Arrow next to the heart picture and you will get more shape options. Select the Arrow.


Step 10. Holding the left button of the mouse please create the arrow shape.
File > Save As your Photoshop Document.


Creating a New Document in Photoshop Elements 4

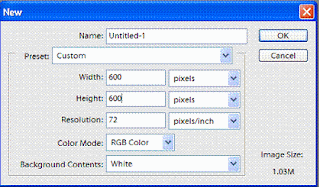
Step 1. Open Photoshop and Select Start From Scratch. You will get a dialog box. Please change the default settings and select the following and click OK.


Step 2. You will get a new document with White Background.


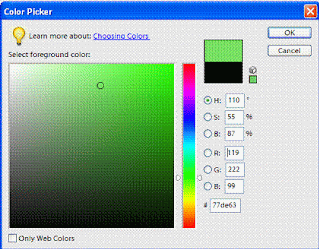
Step 3. Its time to change the Foreground and Background Colors so we can use it creating basic shapes. At the bottom of the Tool Bar. You will see 2 squares. The Black square is the Foreground, and the White square is the Background.
Step 4. To change the colors please Double click on the Black Square and you select a color inside the color picker window. Look at the picture below. Select a color inside the color picker window and click OK.


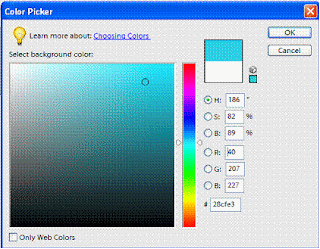
Step 5. Double click on the White Square (Background) and select different Color as shown:


Step 6. Now look at the 2 squares. They have different Colors.


Remember: If you want to change the default colors, Hit the letter "D" in the keyboard

Step 7. It's time now to Paint the new Canvas. You can select the Paint Bucket Tool , then click on the canvas. You can always use the following shortcuts:

Alt + Backspace key: Color the canvas with the Foreground color
Ctrl + Backspace key: Colors the canvas with the Background Color.